Classroom Tour 2017

Classroom is ready for the arrival of 17 new students. After several long days of hard work, it has come together. I love bright colors and a cozy atmosphere. One of the biggest parts of setting up the classroom is how it will work with my classroom management plan. To ensure it is conducive for learning and function I walk through the typical school day and determine if all the supplies and seating is easily accessible. I also look at the placement of furniture and items to best meet transition needs and that flow is smooth. I have created a teacher vlog on Youtube giving a classroom tour. The video is linked below. 


Here are some of my favorite classroom elements. 

Reading Nook


I couldn't let these great windows go unused for reading. This is the perfect place for students to get cozy with a book and build stamina in reading. Great lighting and comfy seating makes it an excellent reading spot! 

Classroom Library 

Library looks much more cohesive and clean with new library labels and uniform black baskets. Students have plenty of space to book shop and pick a just right book. Above the library is a display where students will put their work. Also to the left of the library wall is the word wall. Sight words will be displayed after introduction. 


Writing Center 

The writing center is where students may go to write during their center rotations in the morning. This is also where students record their writing goals and are able to go and have the supplies necessary to write creatively. The table has been dropped to the lowest level to allow students to sit on the rug for an alternative seating choice. Students also have lap desks they are allowed to take anywhere in the room to work on writing. If you would like more information on the writing center and goals, I will be doing a post and video just about this element if your interested in the near future.


Classroom Jobs & Birthdays

Students will find their weekly jobs on the side of the cabinet each week. Each student is given a student number. They can easily locate their number and find their job. Birthdays are displayed next to the calendar for easy access.


Student Organization 

There are many supplies students need to complete various tasks in 2nd grade. I am big in community supplies. I believe it is an element of my classroom management that works for me. Students do not keep supplies such as: crayons, scissors, glue, pencils, erasers, and markers in their desk. I found that students have a tendency to play with those types of items, when they have them inside their desk. It also helps keep control of what can be a desk disaster. Earlier in my career when a student's desk became unbearable and needed cleaning out,  I would find a dozen pencils shoved at the back of students messy desk. Pencils were always disappearing. This has helped tremendously. 

I also believe students should always have a book readily available at their fingertips. This is especially important when there is any down time, such as early finishers. My sweet husband took my idea and built me a shelf to put between desks to hold students book boxes. I have used it for the past four years and still love them! It also has a cubby at the end for students to keep additional supplies needed for math. 


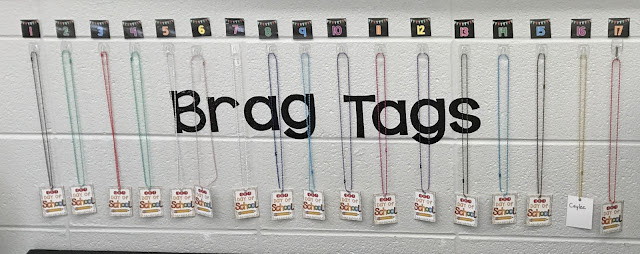
                                  Student Rewards and Incentives


 What student doesn't love to use special supplies? This was an idea that is not my original idea. I saw several teachers using this special VIP desk as an incentive for students to earn based off behavior or academic achievement. I put together fun supplies like Mr. Sketch markers, fun highlighters, twistable crayons, cute pencils with animal erasers, special sparkly scissors, and a metallic ruler. The big topper is the rolling chair. 


This is my second year implementing brag tags. The students earn tags based on behavior and academic achievement. Student are awarded once a week and are allowed to wear their brag tags on Fridays.  It is a big deal in my classroom. 


I also had my sweet husband build me a stage during the summer for students to share their ideas and work. I added the vinyl saying to encourage students who are reluctant in sharing. I loved how it turned out.

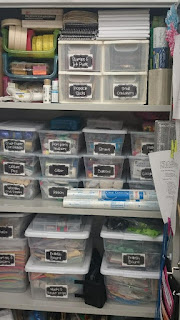
                              Teacher Organization 

The amount of supplies necessary to effectively teach throughout the year is evident by the containers that fill my shelves. Math requires many hands on manipulatives for students to get those concrete concepts. Social studies and science also require a lot of hands on supplies. I found that labeling my containers have saved time! There was a time that my supplies were not organized which took unnecessary time from other important things I could have been doing. What a blessing to be able to find what I need quickly and efficiently.


 Student mailboxes make it so much easier to put together folders with student work needing to be sent home. Again, I used the numbering system for students to make teacher life simpler year to year. Binder clips worked perfectly in clipping student numbers on the boxes. 

I hope you were able to find a few ideas to incorporate in your classroom. I love finding new ideas to make student life and teacher life easier in the classroom! 


Classroom Set Up

It's that time again to begin setting up the classroom for back to school. It is never completely off a teacher's mind. It is alway there in the back of your head, no matter how much you try to distance yourself from school over the well deserved summer. I took the opportunity to go in early and work while the school was mostly empty of teachers and quiet. I opted out of the crazy week which is the week just before we are required to report back. I made the decision to go in early and enjoy my last week away from school. I still have somethings to wrap up, however I am feeling pretty good with where I left off.   I made a quick teacher vlog over the 3 days I worked in my classroom. Check it out below.


Classroom setup https://www.youtube.com/watch?v=P1yzCQlnepM&feature=youtu.be


Check back soon for a complete classroom tour. 

Back to School Bulletin Boards

My mind starts brainstorming about the next school year in June. I wish I could turn my teacher brain off sometimes, but it seems to always be on my mind. At our school district, we put up a back to school bulletin board. I'm not crazy about premade bulletin boards in a package sold from teacher supply stores. Many teachers do use them and they are perfectly okay to use. I just try to have the something that pops a little more. 


Elements can be added to a bulletin board to help them really stand out. Come of these elements include: using 3-D elements, textures, multiple borders, and varied letter fonts. 


One of my loves is GLITTER! I love adding a little sparkle to my bulletin board. 


I incorporated glitter paper to make the leaves on this board. Glitter was added around the edges of each grape to add a little sparkle and texture. Another element used was incorporating pipe cleaners giving the board a 3-D element. 


I also added glitter to the hexagons that made the beehive pop as well. The sparkle draws your eye from down the hallway. 


Using a varied font in varied sizes helps emphasize the title. I also love to use puns in the title. It makes the bulletin boards fun. PUNS ARE FUN! The photo below shows the use of different colors in lettering to emphasize the title. 


Adding multiple layers of border also helps make your bulletin board POP! Play around with the different borders you have and you might find interesting boards combinations you didn't know you had. Black is a great color to add with other color combinations.  


Adding tissue paper can really bring your bulletin boards out and give that 3-D element. The flower added a little pop of color along with texture and dimension.  The googly eyes on the bees also gave a little more pizazz.


A few years ago, I constructed a surfing theme bulletin board. I wanted to be able to place my store bought surfboards on and in the waves. To make this happen I knew I needed to bring in a medium and I knew tissue would work perfectly. Tissue is easy to manipulate. Below you will see a photo incorporating tissue on the board. 


Add fabric to give your bulletin boards some texture. I added velvet to my bulletin board this year. The result was stunning in my opinion. 

I also added lights to liven it up even more. The addition to an element above the board brought interest as well. Do not limit yourself to the bulletin board space. Use the space around the bulletin board to allow room for more student work or larger elements such as the marquee or velvet curtains. 


Check out my earlier post about back to school photos. I am planning on using my back to school bulletin board as my back to school background for the first day of school photos. I made a movie clapper as the prop to go with my bulletin board theme. 

Back to School Class & Student Photos


I love back to school time and creating memories that will last forever! 

Back to school is the perfect time to start making those memories. Every year, I have a tradition in my classroom of taking every student's photo on the first day of school. My first year was a simple photo taken against the wall. Not too exciting. I wanted the photos to be more fun and creative. The photos are used as part of an end of the year gift that I give each student. I like to change it up each year. Most of my ideas are my twist on ideas I have seen from other blogs or pinterest. 

I am including some of my ideas and how I made each of them in case you would like to implement them into your classroom or at home with your own student/students.   
This is a quick and easy prop to use in the photos. I have a Cricut Machine and simply cut the number 2 out on black cardstock and used a white chalk marker to write the "year" and "Grade". You could also print a number out, if you do not have use of a Cricut or Silhouette Machine. 


This is a photo of my son when he was in 2nd grade. I got his photo taken as well. Hence no smile face needed to cover his sweet face. He's in 7th grade now.

This is another fairly easy photo prop to make, I took an old frame I had at home and took the glass out. I made sure it was a frame that was light enough that students could hold up easily. Then, I spray painted it black, so it would blend into the backdrop. Again, I used my Cricut machine to cut out letters and flower die cuts. Glue dots helped secure the letters down to the frame. 

One of my favorite purchases was a black photo backdrop which came with a stand. I initially bought the backdrop for my daughter's wedding reception. It was a great purchase, as I have used it over and over since then. I definitely got my money use from it. It has been used for several different purposes in the classroom. I purchased the backdrop off Ebay for around $50. They range from $30 and $100. 
                                                Image result for photo backdrop with stand

For these photos, I took the black backdrop and strung a string across the stand and overlapped crate paper and curly ribbon to add interest and color. I added a title and the sun for additional pizazz. Some of the students wanted to pretend they were surfing in the photo. Students loved having their photo taken in front of this backdrop! This was very inexpensive I probably spent $5 total on the paper at the dollar store.


Option 4 is another inexpensive prop for the first day of school. I bought a small dowel from Hobby Lobby and cut the rest out on my Cricut Machine. You could easily cut out your shape on cardstock and add lettering or write with a white marker. This was definitely under $5. I again used my trusted black backdrop.                                          

Hobby Lobby carries a chalkboard paper roll for bulletin boards. I took my stand that came with the backdrop and draped the paper over the top bar. I added the lettering (made on the Cricut) and glued it onto the paper. The font was a chalkboard font.  I decided not to write the year on the paper, so I could reuse the backdrop again. This is my favorite back to school photo taken thus far! I used this in my classroom last year. Total spend on this was under $10. I used my Hobby Lobby 40% off coupon to purchase the paper.  


I like to take the class photo in front of my back to school bulletin board. We take a smiling photo and we usually take a silly photo. The first day of school can be hard for some students. This makes it a little less stressful. I had a student teacher last year and thought it was important to include her in all our classroom photos as she was definitely part of our classroom family. 


I hope you found some photo ideas that will help your first day be memorable too!  I love making the first day of school special and capturing it in a photo. 


*** Here's an update to my newest photo prop for back to school 2017. I have a hollywood bulletin board which I will use for the photo background and the students will hold a movie clapper in front of them. 


National Teacher Conference 2017 I Teach 2nd - Las Vegas


I was able to attend the best professional development I have been to in a long time. Interacting and talking with teachers from across the country was amazing. It was interesting to hear teachers speak about their school policies and curriculum. I found some schools were very similar to mine and others were very different. Some teachers had to pay for the conference out of their own pocket. I am blessed to have a district that provides money for personal professional development. They provide each teacher with $600 each year. Since I am tenured, they allowed me to combine two years to cover registration, airfare, and hotel. It was well worth it. 
Photo of transition time between classes. Teachers everywhere to learn and grow as educators! 

So many amazing presenters...

Here are the presenters I saw and what they presented on. 

Dr. Jean Feidman-Let's Make some Happies!
Kayla Delzer-Helping students Demonstrate Understanding Technology
                    The Steps to Flexible Seating & Student-Centered Re-design
Mark Weakland- The Art & Science of Engaging Whole Group Instruction 
Dr. Jo Boaler-The Mindset Revolutions:Teaching Math for Growth Mindset
Marcy Bernethy- Fitting it all in
Cheryl Dick-Reading Strategies that Work or Struggling 2nd Graders  
12 Principles of a Brain-Friendly Classroom
                        Make Learning Stick for Increased Engagement & Achievement 
Donna Whyte-One Size Does Not Fit All (Creating an Inclusion Classroom)
Courtney Bartlett-The Wired Classroom: Ipads,Chromebooks, and More
                             Differentiated Instruction & Reading: Putting It All Together 
Wade & Hope King-Become the King of Creativity
         Fitting It All In
                                           Writing Strategies for Budding Authors
Pat Pavelka-Boosting the Achievement of Your Struggling Readers & Writers
Kyle Schwartz-I Wish My Teacher Knew  


This was an amazing book which focused on the unknown worries and needs of students. It touched my heart and rang true on many levels. I have many students who face things students should never face at their age. I will incorporate the writing prompt this year of "I wish my teacher knew" this in my classroom as well. A great suggestion she had was waiting 2-3 weeks before giving students the writing prompt so the teacher and student can build a little trust and begin a relationship where the student feels safe recording their thoughts down.

Professional Development is an opportunity for me to reflect and reevaluate what I am doing in the classroom. It is where I go in hopes of gaining new and relevant strategies, being inspired and motivated. Some of the best presenters in my opinion are fellow teachers who bring experience and strategies that are applicable for the classroom. Teachers that are in the classroom everyday and get it!  Honestly, I have been to different PDs which left me disappointed. Sad to say... sometimes the presenters are not engaging and it takes everything in me to stay alert. Passionate teachers are easy to spot.They draw other teachers towards them. This is what I found throughout this conference. Passionate Teachers! I took home numerous ideas and strategies that I am looking forward to implementing in my classroom. 

There are several teachers I follow on instagram, pinterest, and TPT.  I was lucky enough to see some of  these teachers present. Below are some photos of these fabulous presenters/teachers.


Hope & Wade King teach at RCA (Ron Clark Academy). Wade is a director of curriculum and teacher. Hope is a fifth grade teacher. Hope is also a creator of Teachers Pay Teachers products under the name Elementary Shenanigans. I witnessed her genuine love of all teachers. She hugged everyone that came up and met her. She intently listened and tried to answer questions. I was in awe of her! 

Wade & Hope King
These two individuals are so inspirational and motivating. I am SO BLESSED to have attended three classes with Hope and one with Wade. If you have never heard Wade's story you need to hear it. He gave us his personal story. You can find a video about him at this link: Wade King Story

One area I wanted to focus on during this PD was technology. Courtney Bartlett provided great material and instruction. She gave many resources and strategies, I will integrate in my classroom this year. She is also a teacher who creates products for TPT. She is also known under the name Swimming in Second Grade

Courtney Bartlett
This is Kayla Delzer. Some may know her by her site name Top Dog Teaching. She is the gooroo on flexible seating.  The link to her website is here:Topdogteaching.com I was fortunate to have two classes taught by her. Helping students Demonstrate Understanding Technology and The Steps to Flexible Seating & Student-Centered Re-design. She presented great content on technology. She gave great resources to incorporate into the classroom. I was intrigued by electronic portfolios for students. This was one highly recommended technology integration suggestions from the conference. She uses SEESAW to create electric student portfolios. The link for seesaw can be found here: Seesaw
Another suggestion included Audioboom. I loved this suggestion. She shared how she has students record themselves reading a book for the listening center. The audio is accessed through a QR code. Other students could access the audio during listening center. I thought this was fabulous on many levels. Great for the reading and the listener both. I will definitely incorporate these two technologies this coming year! 


Kayla Delzer

Mark Weakland presented on whole group instruction. He was also fun and engaging. He lead off with a quote "Most effective teachers are masters of both content and instruction". He gave 10 techniques to bring engagement in the whole group setting. 

  1. Focus Attention
  2. Set Goals
  3. Us I Say, We Say, You Say
  4. Be Direct and Explicit
  5. Regularly use Think Time & Turn and Tell
  6. Positive Reinforcement
  7. Keep the pace brisk
  8. Whole group physical response
  9. Distribute practice over time
  10. Cheers 

Mark website link is found here Mark Weakland Literacy


I did not get a photo of Marcy Bernethy. She presented on "fitting it all in". She is also a TPT teacher. She is the creator under Saddle Up for Second Grade. You can find her link here.Saddle up for Second Grade .  She provided great information as well. 

I would without a doubt recommend this conference to all teachers new and seasoned! The content was relevant to teaching today.  They already have the dates for next year July 9-13, at the same beautiful Venetian Hotel in Las Vegas. I doubt I will go next year, but I would love to go back in the future. If you haven't went and you teach pre-K, kindergarten, 1st, or 2nd grade. This conference is for you!